Each point represents a photo and a focus point. When viewing a tap2focus composition, user will be shown the photo that is nearest to the point they tap. Steps to change points as following:
 to highlight it.
  .
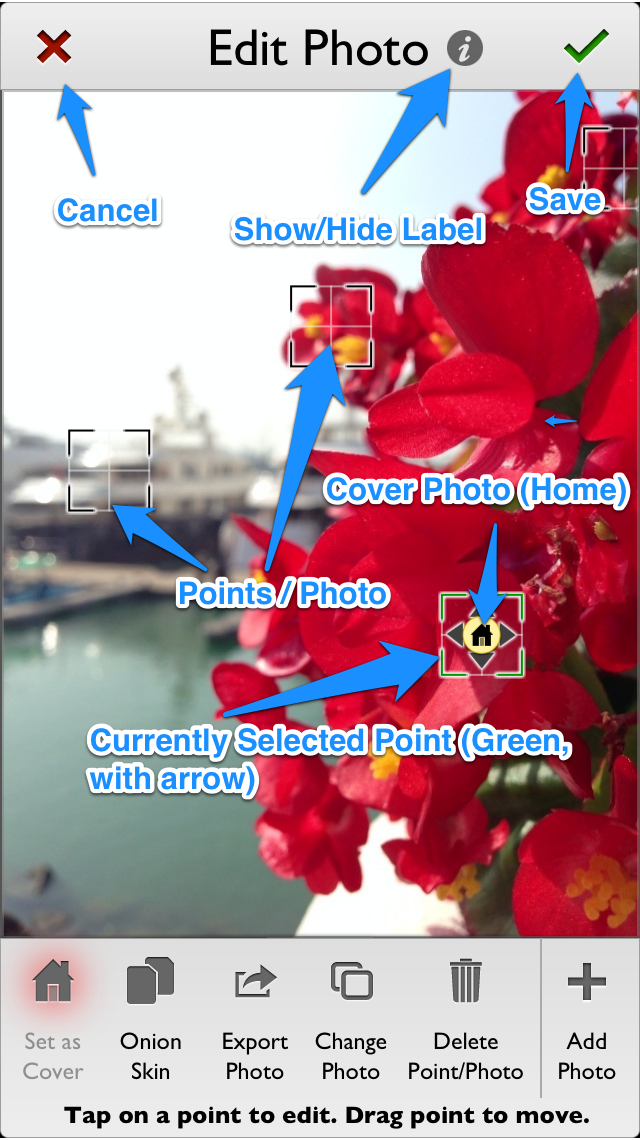
.Cover photo is the first photo that is shown when you open a tap2focus photo. It is also shown in the gallery view, as well as the preview image if you share the photo to Facebook or Twitter. Cover photo is also shown as the Onion Skin. Steps to set a particular point/photo as the Cover Photo:
to highlight it.  to set it as cover.
 will be shown on the point that is currently set as the cover photo.
The onion skin feature shows a semi-transparent overlay of the current Cover Photo on top of the currently select point/photo. This feature is useful as a visual que to align photo (during Add Photo) or to reposition points (during Moving Focus Point).
 to show/hide the onion skin.
Exports the currently highlighted point/photo to your Camera Roll. This is useful if you want to post-process the photo with another app and/or crop the photo (by export, and then, Change Photo by choosing back this photo). Note that exporting photo this way will export a lower quality of the photo. You can only save a high quality photo to your camera roll when you are taking a new photo (by turning on the "Auto Save" the feature in settings). To export a photo:
to highlight it.  to export the photo.
Change/Crop the photo of the current highlighted point. This feature requires you to choose a photo from your camera roll, this allows you to import a photo that is processed by another app (filters). If you want to crop the current photo, you can always Export Photo the current photo first then, select it again from the camera roll.
to highlight it.  to change the photo.
You can delete any additional unwanted points from the tap2focus composition using this function. Please be reminded that once you delete the point/photo, the photo will be deleted permanently, if you would like to keep a copy of the photo, consider Export Photo first. Steps to delete the photo as following:
to highlight it.  to delete the photo and point.
Use this feature to add a photo from your camera roll to the current tap2focus composition. You can then further Move Point to specify where is the point to show this photo.
 to add a photo.